Building, testing and publishing mobile apps with react-native on MacOS
Published: 14 December 2022
This is a general overview of getting started with react-native on MacOS, but general enough to follow on Window and GNU/Linux systems and covers all aspects from local setup, development process and publishing to app stores.

Note: This is a typical setup/procedure I have followed before up to the time of writing, but your mileage may vary depending on your project's age and setup/config.
Typically, you will develop the apps locally in emulators for both Android and iOS. Testing should be done on actual devices with either a signed APK for Android or through TestFlight for iOS devices.
Git Contribution Flow
- Create a fresh dev branch from production branch
- Create a branch for your ticket/task/fix from dev
- All branches should be merged into dev branch
- When all dev work is complete and your app is live in its respective stores, merge dev into production
Prerequisites
- Follow this guide, making sure to follow the section under the "React Native CLI Quickstart" tab for setting up your machine for React Native development. (Building Projects with Native Code)
- You will need to have Node≥14 & NPM≥6 installed
- Java version 1.80 is required for Android builds
- Cocoapods version 1.4 is required for ios builds
- Ensure your .env file has the correct data in it as this is what the build processes will read from. For example, is it using your production or development variables?
- Ensure you have followed any other prerequisite steps in the specific react-native project you're working on as things can change dramatically between versions (as of writing, react-native is still very much beta software and is yet to reach maturity with most builds being 0.x.x)
Next Steps / Dev Process
- Appstore management - Google
- Appstore management - Apple
- Handling expired certificates or credentials
- Upgrading React Native Version
Supporting docs and Quick References
- Getting Started with React Native https://reactnative.dev/docs/getting-started
- React Native environment setup https://reactnative.dev/docs/environment-setup
- Extra dev notes on fastlane: fastlane Setup
- Create APKs with Fastlane and Gradle: https://docs.fastlane.tools/actions/gradle/
- Publish to Play Store as alpha/beta with Fastlane: https://docs.fastlane.tools/actions/supply/
- Further react-native for Android reading and documentation: https://reactnative.dev/docs/signed-apk-android
Apple
- Create iOS app images with Fastlane: https://docs.fastlane.tools/actions/gym/
- Manage iOS code signing certificates with Fastlane: https://docs.fastlane.tools/actions/match
- Publish build to TestFlight with Fastlane: https://docs.fastlane.tools/actions/pilot/
- Further react-native for iOS reading and documentation: https://reactnative.dev/docs/publishing-to-app-store
Local Development
Setup
git clone <YOUR GIT REPO> app
cd app
cp env.example.js env.js # if you don't have an example env file, make your own
npm ci
cd ios && pod install
Git Contribution Flow
The production branch should be an accurate reflection of the exact builds that are live in the respective stores.
We should make use of dev or feature/your-feature branches for local development and testing to keep production pure for hotfixes and patches
Note: You may wish to replace instances of dev with feature/your-feature in the below example
- create a fresh
devbranch from theproductionbranch - create a branch for your ticket/task/fix from
dev - all branches should be merged back into
devbranch - when all dev work is complete and your app is live in its respective stores, merge
devintoproduction
Development Workflow
Running the Metro Packager
Running the packager will watch for file changes and rebuild the JavaScript.
Start the packager with
npm start
Running the App in Simulators
Then run the app with
npm run android
# or
npm run ios # Mac only
If you are on a Mac then you can also run the iOS app directly within Xcode.
What code lives where?
Here's the anatomy of a typical react-native app - it's pretty much a react app with some special sauce for the react-native magic ;)
android/
├─ gradle
│ │ Gradle configs, shouldn't need to touch this folder outside of performing
│ │ react-native version upgrades
│
├─ app/
│ │ Again, shouldn't need to touch this
│ │
│ ├─ build/
│ │ ├─ outputs/
│ │ │ ├─ apk/
│ │ │ │ This is where you'll find your APKs once you produce them, in their
│ │ │ │ relative `release` and `debug` folders

assets/
│ This is the best place to store assets such as optimised images, fonts, icon
│ packs ect
│ This keeps the `src` folder as clean and JS-focussed as possible

fastlane/
│ Fastlane does the heavy lifting for building our compiled apps.
│ With the right configs, it will build and publish testing and production
│ app versions as well as other magic like posting a message to Slack
├─ Appfile
│ Acts a bit like an .env file where you may want to specify values that can be
│ used in multiple places, for example: app_identifier('com.<company-name>.<app-name>')
│ package_name('<company-name>.<app-name>') etc
├─ Fastfile
│ Import your individual lane_x files here and run them together.
│ Why do this? Because with one command you can build both app images and deploy
│ to dev envs by just typing `fastlane alpha` in one go!
├─ lane_android/ios/slack/whatever
│ Lane files contains specific build steps relative to the target. Android lanes
│ will contain configs relating to gradle. iOS lanes are a bit simpler because
│ of the pre-req work provided by Podfile
├─ Matchfile
│ TODO: Even I'm not sure what this fella' is :D assumed to be similar to the
│ Appfile

ios/
│ Pod files are equivalent to package.json and package-lock.js, but are used as
│ part of the iOS native side of things.
│ These get built when you run `pod install` and are generated from the
│ aforementioned package.json
├─ Podfile
├─ Podfile.lock

src/
│ Business as usual for React development
├─ components/
├─ consts/
├─ types/
├─ App.tsx

index.js
│ The application entry point for NodeJS
│ You shouldn't need to touch this and should make changes to `/src/App.tsx`
│ instead.
Debugging
Oooo you're in for some fun...
There are already some great docs from FB themselves on the topic: https://reactnative.dev/docs/debugging
TL: DR; Install their react native dev tools which will let you debug the app in the same way you use Chrome DevTools. The alternative before this was a thing, was to use this https://github.com/jhen0409/react-native-debugger project which you install via brew, but is less recommended these days since the RN project built their own.
Testing Builds on Devices
Building Android test images
Run fastlane android build to build a .apk for local testing.
The output file can be found in the output folder: android/app/build/outputs/apk/release
However, to do so you will typically need the keystore and the api-*.json file. For example, most apps will have the two following files which you should store in private repos outside of your project and include in the respective folders when working locally
android/app/<app-name>.keystoreandroid/api-8406303822908941250-440647-259f73747ee8.json
These .apk files can then be distributed to individuals and side-loaded onto Android devices for testing, but really, they should be uploaded to the Play Store as alpha builds (so they can then be "promoted" to production builds later down the line, as is the process with iOS builds)
TODO: Need to show/explain
- side loading
- loading dev build from google play console
Building iOS test images
Run fastlane iso alpha to build and upload an .ipa file to TestFlight.
When the command has executed successfully, you should see your build show up on the TestFlight page (or app if managing TestFlight on an iOS device)
However, you will need all the following in place to do so:
- Have access to an apple developer account under your work email address
- Have access to the apple developer portal and have a team account
- Have access code Signing Certificates associated with the project - they should be hosted outside of the project in another git repo for security best practices. This means you will also need to:
- Request
read-onlyaccess if you are only building and testing iOS apps, or: - Request
read-writeaccess only if you need to update/replace the certificates via fastlane match - Access to the passphrase to decrypt and use the keys
- Request
TODO: Need to show/explain
- side loading - enterpise apple account required but it is possible!
- loading dev build from Testflight and managing their status
Production Builds and Publishing
For most react-native projects, we rely on fastlane to do the heavy lifting for us. You will probably be best severed by reading their own documentation rather than me rehash it here. That said, I'll give an overview of what you need to know to make fastlane do its thing if you're lucky enough to have a project that has already been configured.
One step that is not taken care of by fastlane is incrementing the build numbers and version numbers which has to be done as a manual step (either by hand or with a helper script).
TODO: We might be able to automate build and version numbers even further following https://dev.to/osamaqarem/automatic-versioning-for-react-native-apps-2bf3 or even https://github.com/zmnv/react-native-semver-update
Increment version numbers
We use the react-native-version library to manage incrementing versions, following the MAJOR.MINOR.REVISION pattern.
To do the automagic, you can use the npm command "postversion": "react-native-version",
It's important to get the versioning correct as these numbers are not only displayed to our end users in the app stores but they are also used for admin tasks in the Play Store Console and App Store/TestFlight to manage testing and releases.
Typically, while you're working on new features or tasks, you can safely increment the version once at the start of your work. However, if you publish this version of your app and need to make further amendments for your feature, you'll need to increment the MINOR version accordingly.
Running react-native-version without any additional params will increment the PATCH version by one, and the build numbers by 1.
If you want to increment the MINOR or MAJOR values, you need to specify it in your command or modify it by hand in the package.json and package-lock.json files.
Increment build numbers
Build numbers [explain why they exist]
Typically, it's safe to increment the build numbers for both Android and iOS at the same time even if you only need to create a new Android build - keeping these numbers in sync is just less mess, in the long run, to maintain and causes no actual issues in incrementing either of them unnecessarily. (I've seen projects where the iOS build was 18 and Android was 56 - why? I have no idea, so I made them both 57 and carried on with my life.)
We can use the react-native-version library as described earlier to increment just the build numbers and not the PATCH version like so: "increment-build": "react-native-version -Ab",
If you do need to change the values by hand, you can find them in the codebase by looking for these values: versionCode in build.gradle, CFBundleVersion in Info.plist and CURRENT_PROJECT_VERSION in project.pbxproj.
Building Android production images
Ensure you have the following if your Android requires code certificate signing too. Sometimes, Android apps can be built without the certs but you won't get very far on the Play Store without them!
Service Account Details
These are required in order to push the .apk to the Play Store.
android/api-8406303822908941250-440647-259f73747ee8.json
Keystore
This is required in order to sign the app.
android/app/<app-name>.keystore
Note: We really should be keeping them in repos like we do with iOS and manage rights/access that way rather than bugging.
Finally, you can then run fastlane android alpha to build the app image. (If you want to skip fastlane and produce an APK by hand like a boss, you can run cd android && ./gradlew assembleRelease 💪)
With no extra config, it'll give you an APK in the x folder. With extra config, you can have fastlane submit your APK to the Play Store for you
lane_android configs
- contains steps that will create the app image: https://docs.fastlane.tools/actions/gradle/
- contains steps that will publish to Play Store as alpha/beta builds https://docs.fastlane.tools/actions/supply/
Further reading and documentation: https://reactnative.dev/docs/signed-apk-android
Building iOS production images
Running fastlane ios alpha will create the app image and push it straight to TestFlight for us. It'll also handle the certificates for you so long as you have a minimum of read-only access to the cert repo
Running fastlane match will regenerate the certificates if they have expired or become invalid. You may need to specify a domain such as fastlane match development. You will need a minimum of read-write access to overwrite the existing certs
lane_ios configs
- contains steps that will create the app image https://docs.fastlane.tools/actions/gym/
- contains steps that will pull signing certificates https://docs.fastlane.tools/actions/match
- contains steps that will publish to TestFlight https://docs.fastlane.tools/actions/pilot/
Further reading and documentation: https://reactnative.dev/docs/publishing-to-app-store
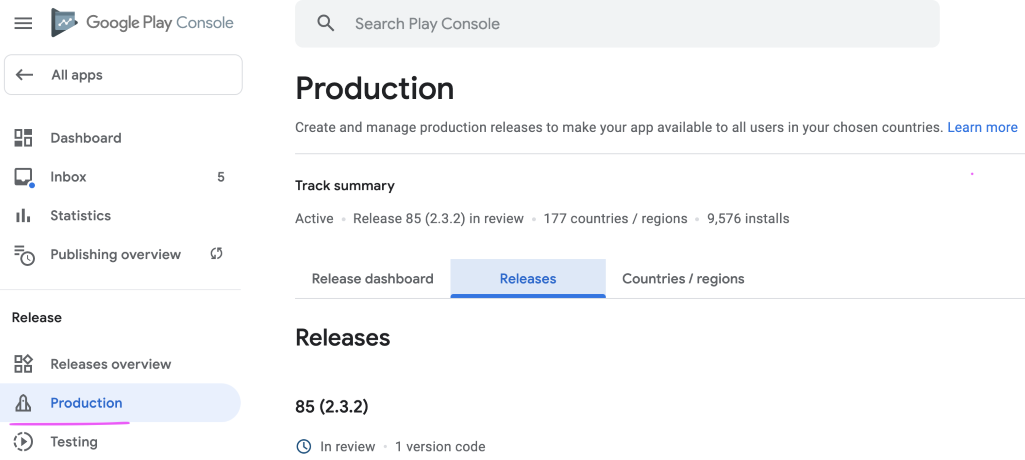
Appstore Management - Google
This section is still a WIP as it's the most complicated part of the project after development (believe it or not, it is!).
Android apps are managed through the Google Play Store
<https://play.google.com/console/u/0/developers//app//tracks/>
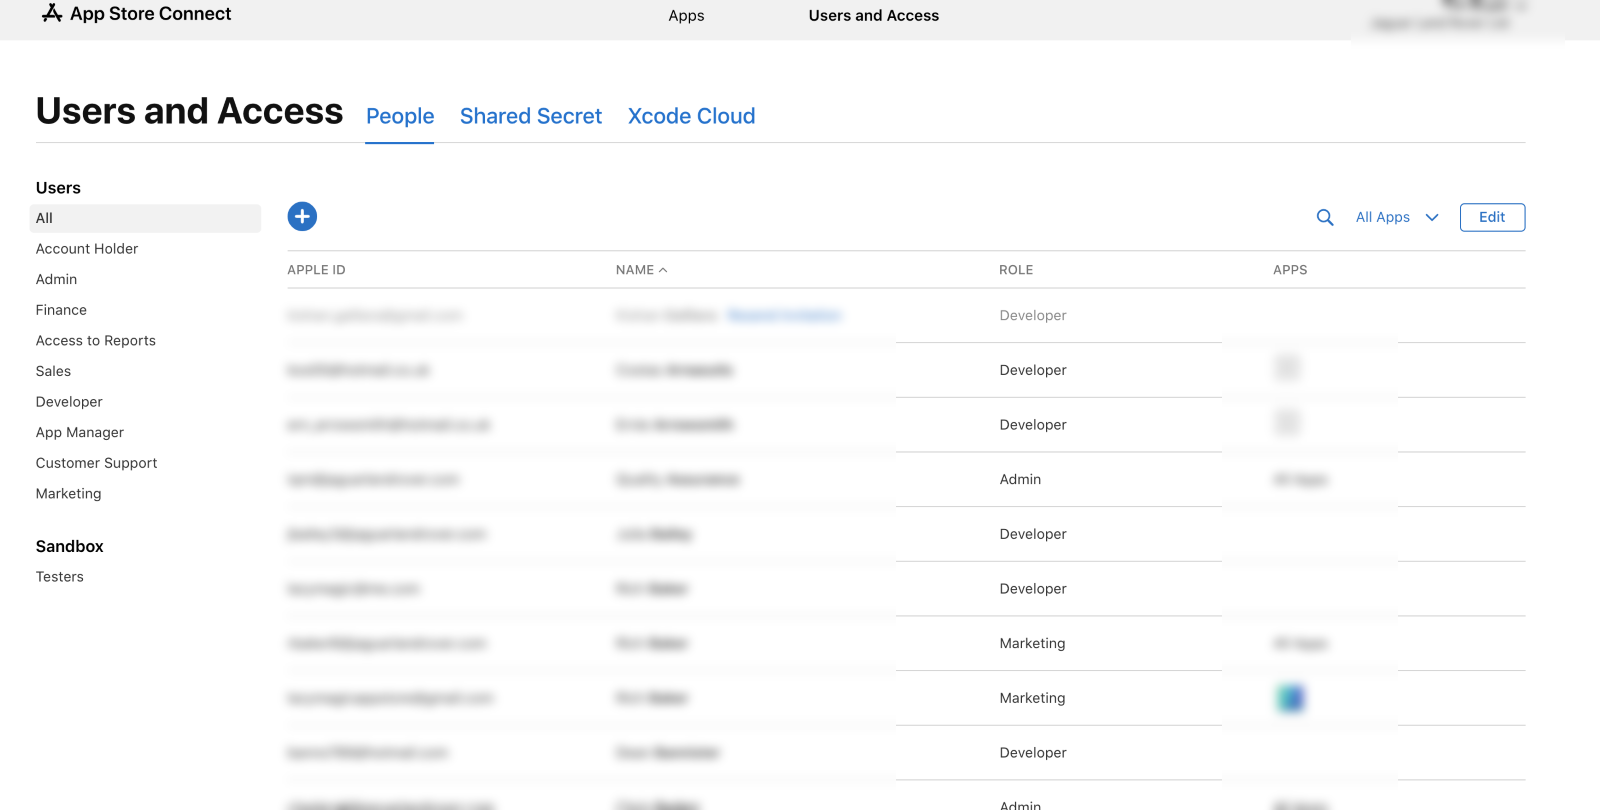
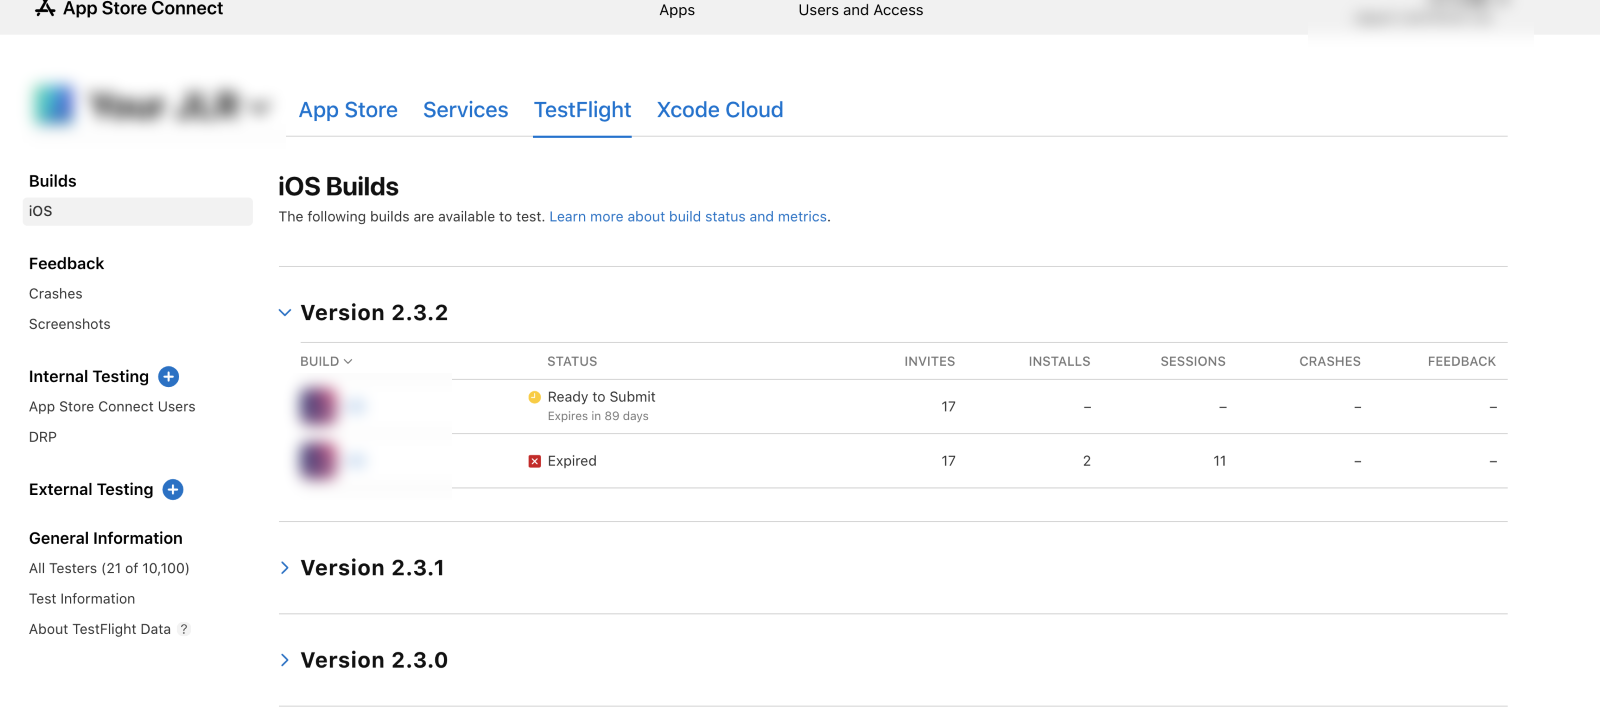
Appstore Management - Apple
This section is still a WIP as it's the most complicated part of the project after development (believe it or not, it is!).
"App Store Connect" Management
iOS ecosystems are managed through Apple's App Store Connect. This is where you will perform actions such as app management, certificate management, user management (for app management - not actual mobile app users)
User and Access
<TODO: I've lost the link for this page>
Certificates, Identifiers and Profiles
https://developer.apple.com/account/resources/profiles/list

"Apps" Management
App Store
<https://appstoreconnect.apple.com/apps//appstore/ios>

TestFlight
<https://appstoreconnect.apple.com/apps//testflight/ios>
Handling Expired Certificates or Credentials
Note: You must have read/write access to the repository that contains your certificates.
-
Delete certs in repo (either development, appstore/dist or both)

-
Delete the certs in appstore https://developer.apple.com/account/resources/certificates/list

-
Within your project
- Run
fastlane match developmentto generate new keys in the repo and a new entry in the apple website - Run
fastlane match appstoresame as above but for appstore and distribution - Then you can run your respective build and deploy process such as
fastlane iOS alphaetc
- Run
Upgrading React Native Version
In later versions of react-native, upgrading has gotten a little easier. However, it can still be a challenge to perform particularly if you aren't familiar with the backend processes that build the app images such as Gradle/Java and Podfile/Swift files.
There is some decent documentation on this process: https://reactnative.dev/docs/upgrading, but there are still some other tips and tricks to consider before blindly just changing those SemVer values!
The below two options combined can make for a half-decent upgrade experience, but my advice would be to only perform the version upgrade if absolutely necessary. I would define "absolutely necessary" as to whether there is an explicit feature you need from a later version, or if there is a major performance fix/upgrade in later versions that your app can't live without. When I estimate for version upgrades, I'd give myself at least 3 weeks mandatory!
React Native Upgrade Helper
This tool is handy in that it'll show you all the git diff changes that occur between two different react-native versions to help you spot anything that could be problematic from a config level. If you've modified a lot of config stuff in your app then this is where you'll start to cry as I did when I had to manage upgrading from 0.59.2 to 0.64.1…
React Native CLI tool
The React Native CLI comes with upgrade command that provides a one-step operation to upgrade the source files with a minimum of conflicts, it internally uses rn-diff-purge project to find out which files need to be created, removed or modified.
In theory, it should be as simple as running the upgrade tool via npx react-native upgrade 0.68.1 for example, handling the merge conflicts via GIT, then you're done. The problem is that sometimes you won't know how your changes should gel with the upgrade changes - which is where the React Native Upgrade Helper tool comes in handy!
Look to https://reactnative.dev/docs/upgrading#react-native-cli for more details on this specific approach
Tim's Secret Option C
- Initialise a new project with
npx react-native init ProjectNamePlease use ProjectName as your project name. It will allow you to do a "find in files" for that string so you can replace all variations of it with your existing values (as sometimes the package name is camelCase, PascalCase or kebab-case) - Copy/paste your src folder, assets, fastlane ect
- Reconfigure your config stuff like image assets for the app, find/replace "ProjectName" with your actual app name, fix build and version numbers as these will be set to the defaults
- Add your missing package.json entries
- Flush all caches and built assets.
Install and use the react-native-clean-project and add the following to your package.json scripts:
"clean": "react-native-clean-project --remove-iOS-pods --clean-android-project",. npm run iosand address any build bugs and in-app bugsnpm run androidand address any build bugs and in-app bugs
With a bit of luck, you might have just saved yourself a world of pain. If not, you can just nuke the repo and try the first two methods instead.
Godspeed!
fastlane Setup
This section makes use of variables that you will need to update. Make sure you update any: <VARIABLE>. Delete the < and > and replace the VARIABLE with your values.
Variables
<PROJECT_NAME>The name of the project as used in githubcom.<DOMAIN>.<APP_NAME>The bundle id that is used in both iOS and Android<YOUR_APP_NAME>This is the name of your.xcodeprojfile found in/ios/<ITUNESCONNECT_TEAM_ID_INTEGER>This is in youritc_team_id. Get this from Itunes Connect<DEV_PORTAL_TEAM_ID_INTEGER>This is yourteam_id. Get this from the dev portal and then, take a look in your query string<PATH_TO_JSON_FILE>This is a path to a file generated when hooking up Google Play
Fastlane Set-up
DOCS: https://docs.fastlane.tools/
xcode-select --installbrew install fastlaneOR[sudo] gem install fastlane -NVcdinto your project rootfastlane init
You will then have a fastlane directory in the root of your app. This will create a folder structure as follows:
/fastlaneAppfileThis is a configuration file where you can define variables and settingsFastfileThis is the main file where you define yourlanes. See example.
iOS Set-up
https://docs.fastlane.tools/getting-started/ios/setup/
To share one code signing identity across your development team to simplify your codesigning setup and prevent code signing issues.
match is the implementation of the https://codesigning.guide concept. match creates all required certificates & provisioning profiles and stores them in a separate git repository. Every team member with access to the repo can use those credentials for code signing. match also automatically repairs broken and expired credentials. It's the easiest way to share signing credentials across teams
IMPORTANT
Only create a repo once for each Apple "Team" (e.g CompanyA/CompanyB) - different projects can share the same repo, as they all share the same pool of certificates.
DOCS: https://docs.fastlane.tools/actions/match/
To use Fastlane match in the project:
- Login to https://developer.apple.com/account/ios/identifier/bundle
- Click on
Identifiers > App IDs - Click the
+in the top right and fill in the form. - Make a note of the bundle id. eg:
com.companya.app - Ensure that <YOUR_USER>@ has access full access to https://itunesconnect.apple.com and https://developer.apple.com for the project
- Leave iTunesConnect for now...
- Create a new, private git repo
https://<GIT_HOST>/<PROJECT_NAME>/signing-certificates cdinto your project locallymatch init- You will be asked to enter the the git repo. Make sure to add the ssh path:
git@<GIT_HOST>:<PROJECT_NAME>/signing-certificates
- This will create a Matchfile your /fastlane directory. You can edit this and update as follows:
git_url("git@<GIT_HOST>:<PROJECT_NAME>/signing-certificates.git")type("appstore")app_identifier("com.<DOMAIN>.<APP_NAME>")username("<YOUR_USER>@<DOMAIN>")
match appstore --username=<YOUR_USER>@<DOMAIN>Will generate signatures for releasematch developmentWill create signatures for debug
Android Set-up
https://docs.fastlane.tools/getting-started/android/setup/
Android is a little easier than iOS. The OWNER of the account will need to do the following - This might be the client.
- Open the Google Play Console https://play.google.com/apps/publish
- Select Settings tab, followed by the API access tab
- Click the Create New Project button
- Click the Create Service Account button and follow the Google Developers Console link in the dialog
- Click the Create Service account button at the top of the developers console screen
- Provide a name for the service account
- Click Select a role and choose Service Accounts > Service Account User
- Check the Furnish a new private key checkbox
- Select JSON as the Key type
- Click Create to close the dialog
- Make a note of the file name of the JSON file downloaded to your computer
- Back on the Google Play developer console, click Done to close the dialog
- Click on Grant Access for the newly added service account
- Choose Release Manager from the Role dropdown
- Click Add user to close the dialog
Then...
- Add the downloaded file into your
/fastlanedirectory - Update your
/fastlane/Appfileto and add the relative path to the json file
Example: /fastlane/Fastfile
You can update your Fastfile:
## Import android/ios lanes - Keeps things tidy
import './lane_ios'
import './lane_android'

## Primary lane
desc "Submit a new alpha on both ios and android"
lane :beta do

    ## Increment build
    increment_build_number(xcodeproj: 'ios/<APP_NAME>.xcodeproj')

    ## Run android beta and ios beta lanes imported above
    Fastlane::LaneManager.cruise_lane("ios", "beta")
    Fastlane::LaneManager.cruise_lane("android", "beta")

end
This imports three file...
Example: /fastlane/lane_ios
platform :ios do

    ## CERTIFICATES
    ##########################################################################
    ## https://docs.fastlane.tools/actions/match

    desc "Get certificates from Apple"
    lane :certificates do
        match(
            app_identifier: 'com.<DOMAIN>.<APP_NAME>',
            type: 'development',
            readonly: true,
            git_url: 'git@<GIT_HOST>:<PROJECT_NAME>/signing-certificates.git'
        )
        match(
            app_identifier: 'com.<DOMAIN>.<APP_NAME>',
            type: 'appstore',
            readonly: true,
            git_url: 'git@<GIT_HOST>:<PROJECT_NAME>/signing-certificates.git'
        )
    end


    ## BUILD PROCESSES
    ##########################################################################
    ## https://docs.fastlane.tools/actions/gym/

    desc 'Build iOS application.'
    private_lane :build do
        certificates
        gym(
            configuration: 'Release',
            scheme: '<YOUR_APP_NAME>',
            project: 'ios/<YOUR_APP_NAME>.xcodeproj',
            export_method: 'app-store',
            clean: true,
            output_name: '<YOUR_APP_NAME>.ipa',
            output_directory: './builds/'
        )
    end


    ## PUSH TO ITUNES
    ##########################################################################
    ## https://docs.fastlane.tools/actions/pilot/

    desc 'Push a new build to TestFlight'
    lane :beta do
        build
        pilot(
            app_identifier: 'com.<DOMAIN>.<APP_NAME>',
            ipa: './builds/<YOUR_APP_NAME>.ipa',
            skip_waiting_for_build_processing: true,
            changelog: "Bug fixes and new features",
            distribute_external: true,
            groups: ["iTunes Connect Users"]
        )
    end

end
Things to note:
- If you are using cocoapods in your project, change: project: 'ios/<YOUR_APP_NAME>.xcodeproj', to be: workspace: 'ios/<YOUR_APP_NAME>.xcworkspace',
- You need to have app icons setup in Xcode for the upload to Test Flight or the App Store to work.
Example: /fastlane/lane_android
platform :android do

    ## BUILD PROCESSES
    ##########################################################################
    ## https://docs.fastlane.tools/actions/gradle/

    desc "Build Android application"
    lane :build do
        gradle(
            build_type: 'Release',
            project_dir: 'android',
            task: 'assembleRelease'
        )
    end


    ## PUSH TO GOOGLE PLAY STORE
    ##########################################################################
    ## https://docs.fastlane.tools/actions/supply/

    desc 'Push a new build to Google Play'
    lane :beta do
        build
        supply(
            track: 'production',
            track_promote_to: 'beta',
            apk: 'android/app/build/outputs/apk/app-release.apk',
            metadata_path: 'fastlane/metadata/android/production/'
        )
    end

end
Example: /fastlane/Appfile
## APPLE - APP STORE
app_identifier('com.<DOMAIN>.<APP_NAME>') ## The bundle identifier of your app
apple_id('<YOUR_USER>@ <DOMAIN>')
itc_team_id('<ITUNESCONNECT_TEAM_ID_INTEGER>') ## iTunes Connect Team ID
team_id('<DEV_PORTAL_TEAM_ID_INTEGER>') ## Developer Portal Team ID


## ANDROID - GOOGLE PLAY
json_key_file('<PATH_TO_JSON_FILE>') ## Path to the json secret file - Follow https://docs.fastlane.tools/actions/supply/#setup to get one
package_name('com.<DOMAIN>.<APP_NAME>')
Find the itc_team_id by running `fastlane spaceship` and then `Spaceship::Tunes.select_team`. It's the numeric value next to the team. If you get an error about a missing gem called pry, follow instructions here.
CI
CI also needs some work. Please see the docs